Use Proxy mode in Awesome Traffic Bot
Software name: Awesome Traffic Bot
Main feature used in this case: Proxy Mode
Available since version: 1.5.4
If you’re using ATB 2.0, please refer to our docs.
Although the ATB first came with the slogan “without using proxy or VPN,” we’ve added proxy and VPN mode to make the bot the most feature-rich traffic bot in the market. Proxy plays an undeniable role in sending traffic on a large scale, especially to send traffic from different nations.
We’ll go through this feature in this article and will learn how to Use Proxy mode in Awesome Traffic Bot (Which is also well-known as Google Organic Search Bot). At the end also we listed our recommendations for proxy providers with their pros and cons so that you can compare and choose according to your needs.
To use Manual Mode you only need to follow these steps, and you’ll be good to go!
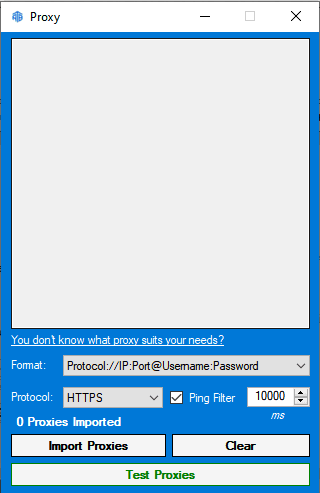
STEP 1: Run the Awesome Traffic Bot and click on Proxy mode to open the settings. You’ll see a page like this:
STEP 2: The bot supports various proxy formats. To proceed, you would need to export the proxies from your proxy provider and save them within a text file. Then, click on the drop-down menu in the ATB to choose the format of your proxies.
For instance, if the format of your proxies (in the text file) is:
192.168.0.0:80:username:password
You should select this format from the list on the Import page:
Protocol://IP:Port:Username:Password
It’s crucial to ensure you have selected the correct format. If the format of your proxy text file and the one you have selected in the bot don’t match, the bot will be unable to import the proxies.
NOTE: The bot also supports rotating proxies with an API to change their IP. So, if your proxy provider has the API to change the proxy IP, you can add it by using this format:
Protocol://IP:Port@Username:Password|API Link
Other proxies formats are also accepted. You just need to separate the API link by “|”.
The bot will send a request to the API after completing each visitor session.
NOTE: Ping Filtration is also a way to determine if the proxy that the bot randomly chose has a suitable condition. However, sometimes if your proxies don’t have high speed at all, this feature might cause the bot to stop working. For instance, if you import 800 proxies, the bot will go through them to find the one with the chosen ping filter. This might decrease the performance as well.
NOTE: All of the other in-house proxies are supported. So, if you have your own proxy warehouse in your home, you can also use this feature.
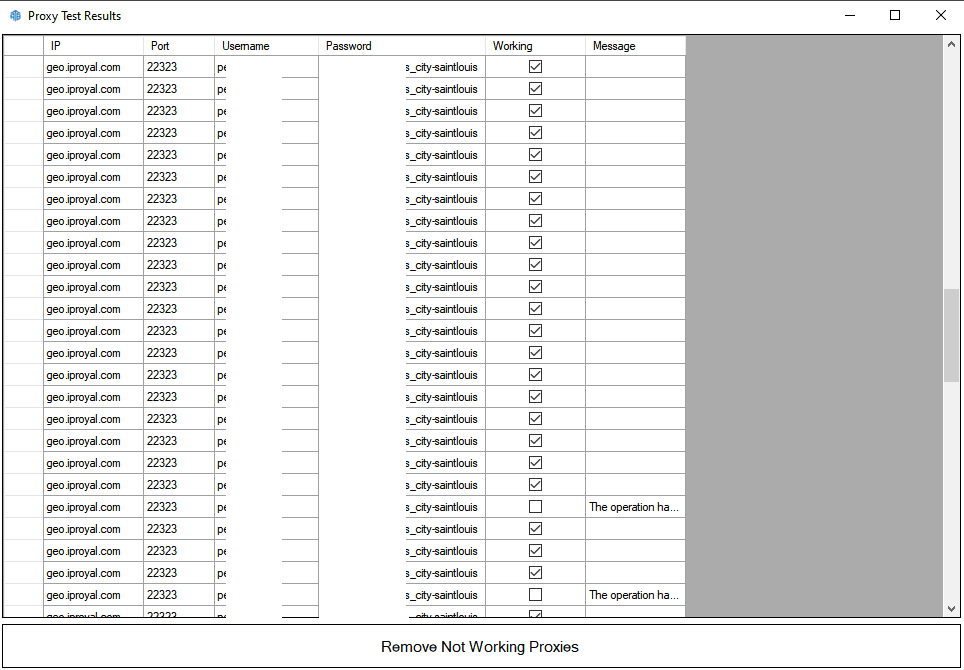
STEP 3: Test proxies by clicking on the button. If you imported a lot of proxies, this might take a little bit longer. Please wait for the bot complete the tasks.
You can also check if the bot parsed your proxies correctly here. You can click on “Remove not working proxies” to remove all proxies that didn’t meet your settings. If you had set ping filtration, it is also applied in the results.
NOTE: If your proxies are backconnect (usually all residential proxies are backconnect, which means a random IP will be assigned at the back-end to your proxy, not a static proxy) ping filtration is not accurate. However, if your proxies have the session duration (TTL, Time-to-live, which means your proxy IP will stay at least for a few minutes), you can still use the ping filtration feature.
NOTE: The bot sends a request to a website to check if the connection to the proxies is truly being established. If the authentication is incorrect or even if your proxies are expired, it will be reported in the results as well.
STEP 4: Close the test reports and settings, you’re ready to run the bot with your proxies!


