Software name: Awesome Traffic Bot
Main feature used in this case: VPN Mode
Available since version: 1.5.5,
Since version V1.5.5, we’ve added a feature to the bot to use premium VPNs as the IP sources to send traffic. VPNs can be a suitable choice for those who need to send traffic from different regions of the world and looking for a cost-effective solution. So, in this article, we’re going to see how we can Use VPN mode in Awesome Traffic Bot
VPN mode itself has 2 different modes. The first mode is NordVPN(added on version 1.6.6 – DEPRECATED) and the second mode is manual setup.
The manual setup supports literally all premium VPN providers which offer OVPN config files to the clients. If your VPN provider offers OpenVPN config files, then you’re ready to go! We also officially started supporting NordVPN! You could manually set up the bot to work with Nord VPN before but it’s never been easier than today! It will be much easier with NordVPN because we handled most parts of the necessary setup automatically in the bot!
** WE STOPPED COOPERATION WITH NORDVPN. After talking with their team, it appears they don’t want clients to use their servers for sending traffic, and we’ve got reports that some of the users account have been blocked and refunded. Please try using other methods, although this method will still be available in the next few updates. But we’re going to deprecate this method soon.
To use Manual Mode you only need to follow these steps and you’ll be good to go! If you want to use NordVPN, simply skip this.
STEP1: If it’s the first time you want to use the VPN mode, you need to download the OpenVPN installer and install it. It’s the protocol used in the bot to make connections. You can download it from the link bottom:
https://openvpn.net/community-downloads/
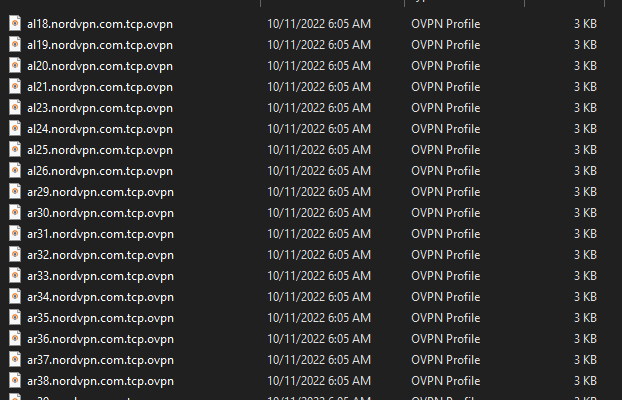
STEP2: Go to your VPN Provider’s website and search for manual OpenVPN configurations and credentials they offer. Download the .ovpn files and place them into a folder you’re willing to use.
STEP3: Open Awesome Traffic Bot and click on VPN mode > Manual Setup to open the manual configuration. Choose the directory where those ovpn files exist, enter the credentials you got from your VPN provider, and then you’re done!
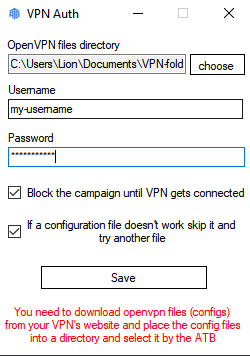
NOTE: If you want to block all campaign(s) activity until the VPN gets fully connected (some VPN servers take a little bit longer than usual to connect), you can select “Block the campaign until the VPN gets connected”
NOTE: Some OpenVPN config files don’t connect. The bot has a feature to skip the config file if it didn’t connect and it will keep trying to connect to one server at the end.
NOTE: Choosing these two features together will cause the bot to stop working if your VPN loses the connection for any reason. As soon as the bot gets connected to a new server again, it will continue sending the remaining jobs.
NordVPN Mode: (DEPRECATED)
Apart from other features and improvements we’ve released on version 1.6.6, we also officially started supporting NordVPN! You could manually set up the bot to work with Nord VPN before but it’s never been easier than today! In this article, we’re going to learn how to use Awesome Traffic Bot with NordVPN.
** WE STOPPED COOPERATION WITH NORDVPN. After talking with their team, it appears they don’t want clients to use their servers for sending traffic, and we’ve got reports that some of the users account have been blocked and refunded. Please try using other methods, although this method will still be available in the next few updates. But we’re going to deprecate this method soon.
STEP1: To use NordVPN, you’ll also need to download the OpenVPN protocol installer. If it’s the first time you want to use the VPN mode, you need to download the OpenVPN installer and install it. It’s the protocol used in the bot to make connections. You can download it from the link bottom:
https://openvpn.net/community-downloads/
STEP2: After purchasing the subscription, simply open the bot and click on the VPN mode > NordVPN. If it’s your first time using NordVPN mode, click on the load button to download and load countries of NordVPN servers.
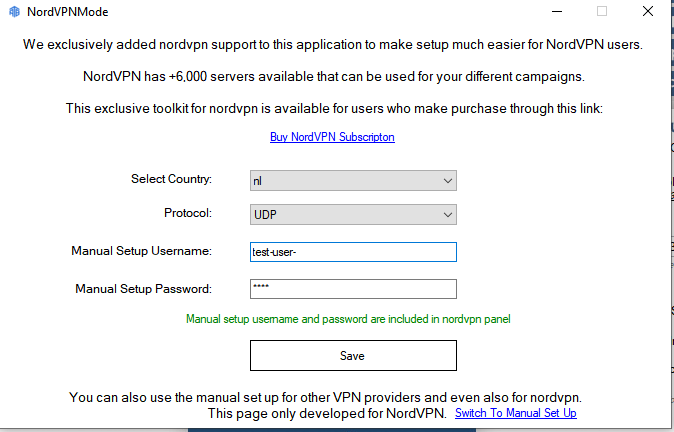
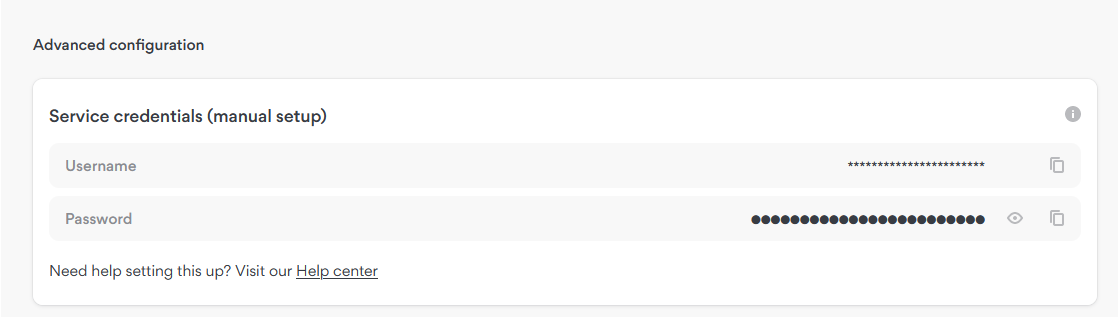
STEP3: After loading up the settings, you need to go to your NordVPN dashboard. After going to the panel, scroll down to Advanced Configuration> Service credentials (Manual setup and copy and paste the manual setup credentials into the bot.
STEP4: Save the settings and use the bot! Changing IP and sending traffic has been never easier than now!
NOTE: You do NOT need to run the nordvpn application to use this method. If you run and connect to the nordvpn application, it will have conflicts with the application.